Published by Revolution Games
Hastings is perhaps one of the most significant events in English history. It is the battle that changed everything, resulting in a total transformation of the political and cultural nature of England. Invasion 1066 is a tactical look at the eight hour battle itself and is based upon the traditional telling of the story in which the Norman invaders attack up the slopes of Senlac Hill, intent on defeating the Saxon army led by King Harold.

The following post gives a description of the system by way of an AAR using the historical scenario.
Please click below to continue.
From the outset, it should be made clear that I am the game designer, so putting aside my obvious favour towards it, I will keep the account impartial and in keeping with the other posts on this site (this is not a review site, things get posted here because I like them to start with).
Some will recognise this game by its former title 'Senlac Hill', which I initially produced as a DTP (Desk Top Produced) game under the banner of Saxon Games. The design has recently been picked up by Revolution Games and has benefited from their development, in particular by tightening up some of the rules to prevent potential unhistorical use of the forces and by substantially upgrading the artwork (thank you Charlie Kibler). Obviously for a DTP'er such as myself, it is lovely to end up with a game that has 'real' counters.
The game is presented in a ziploc bag, so players will need to provide their own six sided dice. The map is 11" x 17" which mostly concentrates on the slopes of Senlac Hill as the focus of this full on frontal brutal assault.
This is a very constrained battlefield. The Normans arrived in the area via the road (bottom right), crossing the saddle of land between the two brooks and then forming up below the slopes of the hill. The Saxons were arrayed along the forward slope of the hill, blocking the Norman army. There is a lot of soft boggy ground, which is difficult for soldiers to move into and it protects the flanks of the hill. The game refers to this type of terrain as morass.
There are three scenarios to choose from. The main scenario covers the traditional battle. The second assumes that the armies arrived on the field a little earlier, so the Normans are trying to get across the saddle of high ground on the valley floor, while Harold, already at Senlac Hill can descend and assault the deploying Normans. The third scenario assumes Harold has been wrong footed and forced into defending Senlac Hill, rather than deliberately choosing it. The Normans essentially get a free set-up. For the purpose of this AAR, we shall be going with the historical scenario which starts at 0900 hours on (Turn 3).

There are some fundamental design principles that went into this game which are worth explaining from the outset.
Invasion 1066 and its sister game, Orri's Storm (Battle of Stamford Bridge) share the same system and at the time of their design, I was considering doing a couple of other battles. It made sense to start splitting the rules into series and specific module rules and that remains the format in this new edition.
This was a very long battle for its time. Both sides were desperate. Harold to hold out a little longer and William to crack the enemy line. I wanted players to feel that draining emotion, so that for much of the game, victory is not immediately at hand and mostly out of reach, with a winning momemtum not building up until the end of play.
Missile type troops were not to be used in lieu of melee troops, that was not their function. In this game, they are in the front line and will open the battle. Whenever they attack and roll a 1 or a 2, they are removed from play and placed into the 'out of arrows' box. Over the course of two or three turns, they are mostly gone, representing that their 'stage' in the battle has passed and they are not left hanging around to be used unhistorically by the players (though in this particular battle, they may get re-supplied and recalled).

I wanted to get away from 'perfect odds' attacks and 'ganging up' attacks and for combat to remain voluntary, so the system uses a one unit against one unit system that relies on strength differentials, with combat results affecting either or both sides on a single die roll.
Although not immediately apparent, the morale system is the engine of the game. I saw these battles in terms of lots of local actions taking place with a side winning in some places and losing in others and some penetrations being made here and there. While elsewhere a trickle of units would start to rout from the field in various places and that as time went on, the routs would become more significant as casualties increased until one side could be seen to tangibly be fleeing the field.

There are two sub-systems that under-pin this. Firstly when a unit is removed from play, adjacent friendly units must test to see if they rout. A die is rolled for each class of unit involved and to that is added the number of units already lost by that unit class. If the result is equal or greater than the groups morale rating then those units will rout. Obviously the more casualties that a side takes within each unit class, the greater the chances of rout of that class becomes.
The term 'class' reflects the way an army is organised, either by nationality (the Normans have three such classes, Bretons, Normans and Franco-Flemish) or by tribal or warrior class distinction (the Saxons have two classes, Housecarls, including Thegns and the General Fyrd). Each of those distict groups will have their own morale break point. This will lead to parts of the army becoming more susceptible to rout than others - at least initially.
The second morale sub-system is that once routing, units are unlikely to be brought back under control and will therefore exit the map. This means that a player will have to think in terms of reserves, gaps and exploitation of those gaps.
Due to the unusual length of the battle, there was a very obvious lull in the fighting, during which time the Norman army re-organised, reformed their lines and brought their archers back into the fray to again open up the fight. The system has an optional Lull turn that only the Norman player can call. It replaces the current turn and allows both sides to re-organise, with a favourable modifier to the recovery test. Importantly, the Lull allows the Norman player to take their archers from the 'out of arrows' box and put them back on the map.
The Norman player will probably be faced with the need to re-organise, especially if playing aggresively and thereby having a lot of disordered units and this will typically be set against the reality that they are running out of game turns. Their dilemma will be whether they will burn off a precious turn for that essential re-organisation or is victory so close at hand, they will just press on. It is a balancing act that will change from game to game and provides interest.
Finally, I wanted the chrome to be in the module rules, not the series rules and for that chrome to be a of a nature that tends to deliver a good narrative and feel. So Invasion 1066 includes, the Lull, the Papal Banner, Bishop Odo, Feigned attacks and impetuous Saxons, who go charging off after routing enemy units and weaken their own positions in the process.
With some of that explained ..... on with the battle.
Set-up.
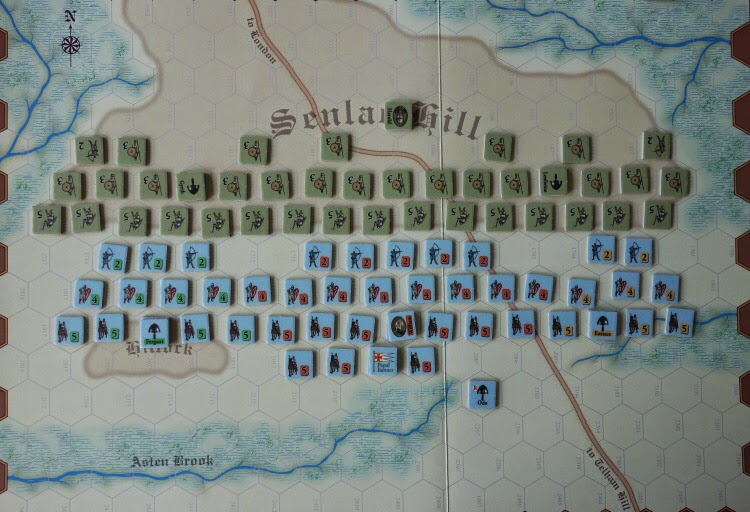
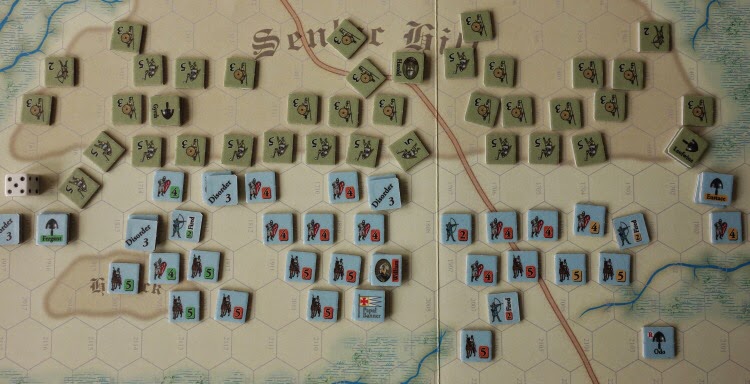
Except for a few leaders and the position of the Papal Banner, there is no scope for free deployment with the historical scenario, it is fixed, it is dense and it delivers an archery barrage followed by a difficult head on assault. This is the view from the Norman side of the board (below). The Bretons are on the left, the Normans in the centre and the Franco-Flemish to the right. Each has archers to the front, then infantry and finally cavalry, with the Norman contingent having much more cavalry than the wings. The papal Banner is with the Norman cavalry and Bishop Odo is set back at the end of Asten Brook.
The Saxons occupy Senlac Hill. The front rank has the Housecarls and Thegns, the other ranks are General Fyrd. The two archer units are placed out on the flank areas. Harold is the centre rear with a housecarl unit.
The Saxon player rolls for their four reinforcements (single fyrd units) as these arrive randomly in each playing. This time they will arrive on turns 3, 7, 9 and 11.
Opening Turn (Turn 3 for the historical scenario).
This turn will be explained in some detail, so that the sequence of play and combat effects are shown.
The Norman player is the first player;
MISSILE PHASE.
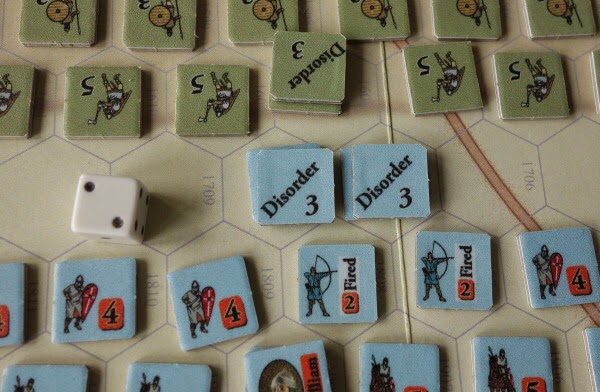
The archers shoot to hit the heavy Saxon infantry and cause disorder. Each unit needs to roll a 6 to hit the heavy infantry. If they roll 1 or 2, they are removed from play and put into the 'out of arrows' box. In todays game, two units go out of arrows and they cause just one disruption - a disappointing start.

MOVEMENT.
The cavalry cannot move for the first two turns unless the Saxons come off the hill. With so many archers still in the field, the Normans decide to hold back for another turn and let the archers do their work. On the right, where the disorder was caused, the remaining archer 'interpenetrates' rearwards and swaps places with an infantry unit. Another infantry unit with the leader (Eustace) moves up as well. Because the Housecarl unit is disordered, it drops from strength 5 to strength 3 (and can't attack in its own turn).

DEFENSIVE FIRE PHASE.
The Saxons are not in a position to use either of their two archer units and they choose not to use their 'once in a game' hand thrown missile allowance, which gives two attacks against adjacent units.
COMBAT.
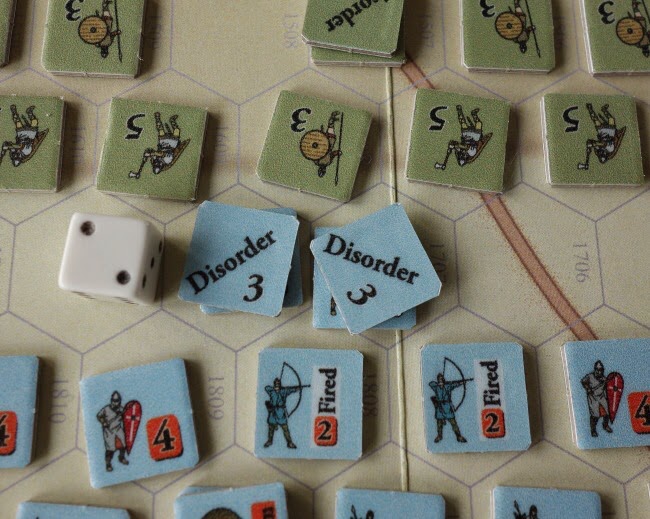
The unit on the right attacks first. The defenders are strength 3 plus 1 for the slope, giving a total of 4. The attacker is strength 4 plus 1 for the friendly leader. This gives the attacker a differential of +1. The differential is added to a D6. A '3' is rolled, so this becomes 4, giving a result that disorders both attacker and defender. Since the defender is already disordered, nothing happens to them, but the attacker gets a disorder marker. The leader does not, but anytime a leader is in combat they must roll a D6 to test for being killed in combat. On a roll of 1 they are removed from play. In this instance a 2 is rolled, so all is well. Leader involvement is sometimes necessary and always risky.
The other infantry unit now attacks, but without leader assistance or other advantage, their attack is 4 against 4, so a differential of zero. The D6 score a '1' .....oh dear! the attacker is eliminated.

The Franco-Flemish class have the lowest morale rating in the game, this being 7. They must roll to see if any friendly unit adjacent to the lost unit routs (there are two Franco-Flemish units adjacent to hex 1702 that might suffer, the archer and the infantry with Eustace). They roll a '3', the one casualty is added to give 4, this is less than the moral rating of 7, so the two units do not rout. If they had rolled a 6 then they would have routed. As casualties within each class increase, it become harder to avoid routs.
REORGANISATION PHASE.
Disordered and routing units not in an enemy ZOC can attempt to recover, but a routed unit must also be with a leader to do so. In this instance there is only one disordered unit in the Norman army and that cannot attempt recovery because it's in an enemy ZOC.
THE SAXON PART OF THE TURN.
The Saxon player now follows the above sequence of play. They will want to get the disordered housecarl out of the front line so that it has a chance to recover. While disordered it is weakened in defence and cannot attack, though it does keep its ZOC. The line shuffles around, the housecarl falls back and their place is taken by a lower strength general fyrd unit. This is the way that the Saxon line deteriorates over time as these weaker units replace fallen housecarl units.
The Normans cannot use their archers in the defensive fire phase because they have already fired this turn.
The Saxons do not want to engage in combat at this stage. Advance after combat is mandatory and facing is kept. They most certainly don't want to be drawn of the hill. In the recovery phase, the disordered housecarl recovers. Finally in the End of turn phase, all archer units are returned to their non fired side.
TURN 4. (second play turn in the histrorical scenario)
Three Norman archers go out of arrows, but two disorders are caused. Much better. Ideally getting disruptions against two adjacent units helps the attackers more, but all disorders are welcome. One occurs in front of the Bretons and the other in front of the Normans. The archers fall back by swapping places with the infantry behind them. Other infantry also move up. This is the time for the Saxons to throw their hand missiles, but both those attacks fail.
The Breton leader (Fergant) joins in the attack on the left, but in the centre, it is too risky for William to do likewise at this stage. If either William or Harold die on the field, a sudden death victory is handed to the other player. All the infantry assaults fail, though Fergant remains unharmed. In their part of the turn, the first housecarl that was disordered now returns to the front line, but the two housecarls disordered in this turn are pulled back and again replaced by general fyrd units. These two housecarl units then fail their recovery tests.
Turn 5. The cavalry are now released for use.
Cavalry weave their way forward to pick out the weaker general fyrd units. Over on the right, the Saxons have recovered, so Eustace and a cavalry unit move to attack and a second cavalry unit moves up. The intention will be that Eustace will disorder the defender to weaken it and then the second cavalry unit can attack it. The Normans get some excellent rolls and breach the slope in three places, eliminating 1 housecarl and 2 fyrd units. Both of those unit classes have high enough morale ratings for tests not to be needed at this stage

However, advance is mandatory and facing must be maintained, so each attacking cavalry unit advances into the breach in the certain knowledge that adjacent housecarls will turn and savage their flank. In doing so, the Saxon units then expose their own flanks to the units below and this is how the battle opens up to lots of separate small actions and management of the line becomes critical.

In the Saxon part of the turn, as predicted, housecarls turn and attack the cavalry flanks, but over on their right they also spot an opportunity to harm the Bretons with a decent attack into the Breton left flank and they come off the hill to make that local counter-attack. Gyrth (Saxon leader) does not join them as he is holding back to assist disordered troops to recover.

This is a fairly critical point in the battle and it does not go well for the Norman army. The Bretons lose two cavalry units and Fergant is lucky to survive. He moves and stacks with the archers. The Bretons pass their rout check. The other cavalry units on the slope are successfully attacked and removed from play. Also the Saxons rally their two disordered housecarls. This has been a good turn for them, but they now have gaps and exposed flanks following their successful attacks (such is the nature of this game system). At the end of the turn, a quick Victory Point counts shows the Normans have 7 points, but the Saxons have 18 and are not looking too vulnerable at the moment considering Norman efforts.
Turn 6.
The Normans go full tilt to try and recover the situation and hit the enemy line before it can reinstate an intact defensive line. They even attack with the cavalry unit holding the Papal Banner. This gives them two die rolls and they can discard one of them - but they roll double 2's, useless!
On the right, they try another double cavalry attack with Eustace to first disorder the enemy and then use the second unit to attack it in its weakened state .... but it all goes wrong when a '1' is rolled. One attacking cavalry unit is removed from play and the units adjacent must take a rout test. The Franco-Flemish class have lost 3 units so far, including the one just removed and they roll 6, giving a total of 9, which exceeds their morale rating. Accordingly, the two units adjacent to the lost unit both get rout markers and flee. Eustace survives and chooses to move with the routers in the hope of recovering them later.
It was a housecarl unit that caused the units to rout. Had it been the general fyrd, they would have had to take an impetuous test to see if they would break ranks and pursue the routers.

The Saxons now have to decide whether to launch a counter-attack from their left wing, or use the moment to re-establish their line and defensive position. They decide to attack. They are mainly fyrd, but the gaps and exposed enemy flanks are too much of a temptation. The Franco-Flemish force loses another two infantry units and a cavalry unit. Eustace gets away, but the collapse of the Norman right wing is complete.
The situation is dreadful. The Norman centre and left are still strong with few casualties. The slope is strongly held by the enemy, however they need to win in another part of the battlefield to reverse their fortunes and to do so before the Saxons start to roll up their flank. They don't really want to call a Lull, but it looks like it is their best tactical option to help them re-organise and to get their archers back to give them an extra offensive capabilty.
TURN 7 replace the normal turn with a Lull turn.
The Normans pull their line back, recover units and then bring their archers back from the Out of Arrows box. The Saxons secure their positions and recover units.
Turn 8.
The Norman archers cause two disruptions and three archers go out of arrows. With the Saxons now on the the open ground to the right flank, Norman cavalry can start to make charge strikes against their infantry, although this turn, they are not best placed to do that (note in the photo below there is an isolated disordered Norman unit, this is a cavalry unit that charged and then disordered, but being unsupported, got isolated).
With renewed vigour the Normans remove 2 housecarls and 2 fyrd units and they get two of their own units up onto the slope (far left). Every gap, exposed flank and enemy disorder is exploited. In their part of the turn, the Saxons launch a massive counter-attack across their entire front. The Norman cavalry unit with the Papal Banner routs and drops the Banner. The Normans lose 1 archer, 4 infantry and 4 cavalry. These are serious losses, made worse by those routing units that were hemmed in and removed from play for not being able to rout away.

Turn 9.
William attacks (a sure sign that things are desperate), he takes the casualty test and survives. In today's game, leaders have been very involved in combat and always survived - that is not very typical of the system (or my usual luck!), there are frequently leader losses in most games.
Casulaties are now so great that all the classes on both sides are susceptible to rout. This is the point in the game that despite their own losses, each player hopes that enough enemy units can be routed in the next turn as to really bring about the momentum of victory. By the end of this turn there are an additional 5 Norman cavalry and 1 Breton Infantry unit in the dead pile and 7 Norman army units are routing towards the edge of the map. It really does look like it is all over for them.

Turn 10.
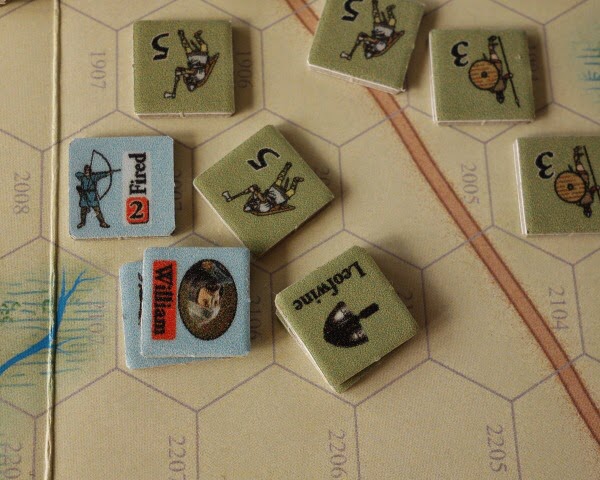
The Norman army makes best effort to retreat out of harms way. The Papal Banner is laying on the ground, but any Norman unit that tries to retrieve it will surely get surrounded and eliminated. William is bringing up the rear of the remnants of his army and is attacked in the flank by Leofwine (Saxon leader), both sides get disordered, but importantly, both leaders survive. However, the second housecarl unit attacks and gets an elimination result on the Norman unit. William rolls for survival, but gets that dreaded '1' and is killed on the battlefield. This automatically becomes a sudden death victory to the Saxon player, though in any case, looking at the field the victory is clearly Saxon and well deserved.
Conclusions - that AAR went fairly well. The only part of the game that we did not really look at was Feigned Attacks. After turn 7, once per turn, a Norman cavalry unit can feign an attack during movement and roll on the Feigned Table. The results can backfire on the Norman player, but when desperate, as they were in reality, it can be a useful option to get into the Saxon position.
While units are routing towards a players baseline, they do not yet count as being lost, but the player knows they soon will be and that this will put extra pressure on the class morale rating. As units become more embroiled in battle, gaps open and flanks become exposed, the successful attacker can easily become the successfully attacked and so it goes on, with players hoping that it will be their next wave of assaults that final break the enemy in enough numbers to matter. The point at which a player feels they may have lost but thinks things may turn around in the next moment can quite possibly be experienced by both players at the same time. The design notes suggest that a player has two or three games before making judgement on the game and there is good reason for that.
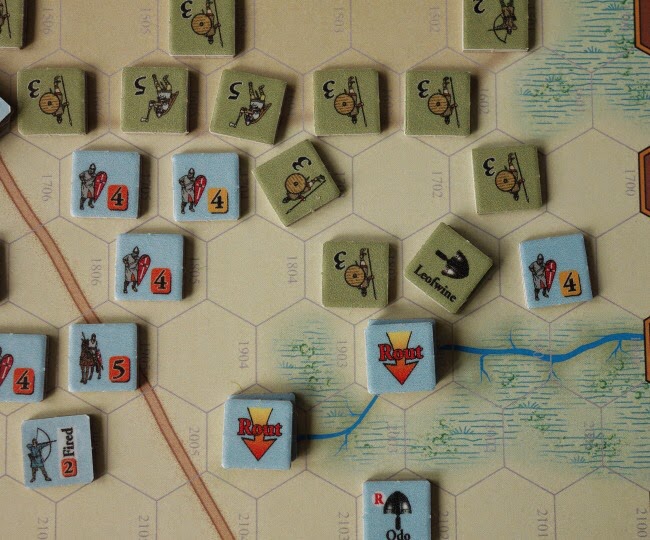
The charge rules do not get much chance for use in Invasion 1066 because of the terrain, though if the Saxons come off the hill or scenario 2 is played, there is some limited scope to see the cavalry charge in action. When putting the system together, I envisaged doing amongst other things a Crusades game and so in that regard, to date, the cavalry rules are under utilised. Below - the charge path of cavalry is shown. They get a +2 in combat, but go disordered after the charge, so the decsion to charge is not something to be made lightly.

Solitaire - The game is a two player game that is fully suitable to solitaire play in the same way that many hex and counter games are. At the outset of this project (over a decade ago) I did consider doing the game specifically as a solitaire system with the Norman side being handled by the player, but it was clear that there was enough tension and drama in the battle for both sides to be managed by a live player.
Size - This is a compact game. The map is just 11" x 17" and the turn track and admin boxes are on the map, so the game doesn't need extra space for charts and such like. It is an ideal size to take on vacation and fits well with the aim of this site of supporting gaming in small spaces. There is a nice sheet of examples (below) printed on the rear of the game cover, but this can sit with the rulebook to one side. The counters are half inch, but the hexes are large enough that the close lines of troops are easily managed.

Time - The game can easily be played in under two hours.
Complexity - The game was intended to sit at the lower end of the complexity scale. I would suggest that the first game or two might be considered to be 4 on a scale of 10 and thereafter around 3.
I would like to thank Roger Miller and Richard Handewith for their development time and for putting this game out and Charlie Kibler for the artwork. It has been a pleasure to work with Revolution Games and fascinating to have some insight into the production side of the hobby.
This game is available direct from REVOLUTION GAMES
and in the UK, it is also available from SECOND CHANCE GAMES.
Sounds like a great game, congrats!
ReplyDeleteThanks Phil, I am delighted the way it has turned out - norm.
ReplyDeleteJust bought the game and your article here puts things in order so I can easily understand and enjoy. Thank You! Looks like a OUTSTANDING Game!
ReplyDeleteThanks very much for supporting the game. It can take a few games to 'appreciate' the best ways of handling the Norman army. I hope you enjoy your games with it. Norm.
ReplyDeleteI've been enjoying the game immensely. The rules are well written and easily absorbed. I like the tandem results for some combat rolls, and the effect of deteriorating morale on routing--even the best made plans can go sideways in the chaos of battle.
ReplyDeleteThanks Will. We did a face to face game last night (part of my checking of the series rules for the upcoming Stamford Bridge game later this year) and the Normans opened by causing a very unusual 4 disruptions and three of those were against a group of three adjacent Housecarls - so I am still getting surprises out of the game.
ReplyDeleteI like the idea of isolated routs happening along the line, before things deteriorate into the larger scale rout.
Originally I had thought of making the game a solo system, with an AI controlling the Saxons, but it became clear pretty early on that there was a lot of fun to be had as the Saxon the player.
thanks for supporting the game over on BGG.
Norm.
This comment has been removed by the author.
ReplyDelete