 |
| Marine Dreadnought |
The armies are relatively small, cheap and paint up really quickly, so make the ideal starter project that is more likely to be seen through to a conclusion.
Please use the 'read more' tab for the rest of this post looks at how the armies were put together, with a few shots of them in action.
Having taken a year to get the basis of my 12mm ACW force up and running and having two 10mm napoleonic armies next in the queue, I fancied a fast and fun distraction project. Two Sci-fi armies from Pendraken fitted the bill perfectly for some small table action. What surprised me most was that I had this stuff all ready for gaming within ten days.
 |
| Night vision - an Alien attempts to infiltrate |
£14 gets a Marine army pack with an APC, a Dreadnought, 2 Walkers, 4 crewed Heavy Support Weapons and 20 Marines that include 5 flamers, so it makes sense to have 5 Marine squads with 4 figures on a base.
 |
| Aliens lurk in the rubbled shadows |
The Alien starter army also costs £14, giving a Queen, 30 Aliens of various sizes, 2 egg clusters and 10 little face hugger / crab like things that scuttle around. I also had a single bag of 5 Alien creatures that I had previously added to my pre-order list for the Phalanx wargame show, as I had wanted to assess the figures anyway for a project - it just so happened that on the day I also went ahead and bought the army packs as an impulse buy.
Pendraken do a good selection of MDF bases, so a few of them were added to the purchase to supplement my growing stash of wood. Finally I wanted to make some 'Seeder' type models for my story-line, so a local shop visit got me 6 plastic ping pong balls for £1. Taken together and accepting that I already have suitable terrain for my 'earth battles', the whole project cost around £32. In the future I might buy a few individual bags of kit to 'grow' my forces, but there is plenty enough here to get some good gaming done.
The first job was to clean up the figures and glue the heavier pieces to their bases ready for priming.
 |
| These are fairly weighty models |
The Dreadnought's gun was replaced with a bit of a plastic shape from an old Zvezda kit sprue, as I thought plastic might be more robust than the metal gun supplied. I usually leave turrets loose on vehicles, so if one is dropped, there is a chance that the turret will fall away rather than getting a smashed gun, but here I locked down the APC turret with glue and so a small sliver of plastic was super glued under the gun barrels so that they would not get knock out of shape if there was an accident.
 |
| The APC and two Walkers on patrol |
 |
| I prefer infantry teams on linear bases |
The Alien figures are quite large, especially the Queen which stands 20mm high. The Aliens have been based in three's, on 50mm x 40mm bases, which gave enough room for them to still have an individual presence.
 |
| Aliens swarm out into the open ... run away! |
The Queen has been given her own base, but around her feet I put a few of the juvenile Alien crab things, a sort of nod to a nursery or protected brood.
 |
| The Queen the young |
During the cleaning up of the base bottoms, two Aliens (the warrior class) were lost through snapped ankles, so just watch out for that.
 |
| Hidden dangers - a nest amongst the ruins |
Likewise the egg clusters had some recently hatched juveiles placed threateningly around the base.
 |
| A nest base with Juveniles and a Juvenile base |
A couple of bases were made with just the juveniles on them. These would become fast attack or ambush bases in the game.
 |
| Juveniles in ambush positions |
Finally, I wanted a couple of 'seeders', with the story-line being that these, as part of the invasion force, were organic egg laying factories. This is where the Ping Pong balls come in (plus dried tea leaves, a water bottle cap and kitchen paper towel).
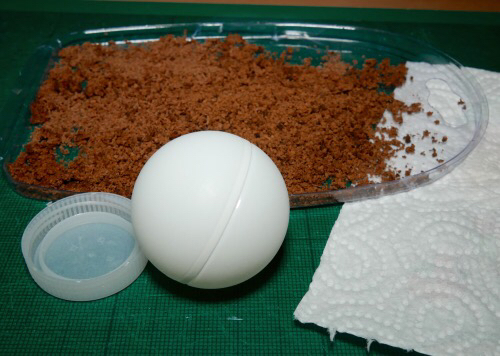 |
| Materials for the seeder model |
The ball is mounted on a plastic cap from bottled water and then a roughly cut disc of kitchen paper towel is coated with PVA glue (I added brown acrylic paint to tint the glue) is wrapped over the ball and trailed down to the base (MDF disc). Once dry it is painted light brown and the veins created by the paper towel folds are highlighted in purple.
 |
| Stage 1 of the seeder model |
All the tissue area is again given a good coating of PVA, but keeping the glue off most of the purple veins. The model is then generously covered with old tea leaves from well dried out tea bags with a pinch of green flock added to give an organic look. This didn't actually work, as the flock stuck but the tea leaves mostly fell away. A second coating of flock was applied to the bald looking orb and then a fine misting atomiser was used to spray watered down brown Humbrol paint, which substantially darkened the green flock and took me back closer to the tea leaf look I wanted - though I now think I might put a leafy netting over part of them instead.
 |
| A pair of Seeders |
If I had kept them green, as they look a little tree-like it would have helped them hide amongst woodland terrain, an opponent might not see them if they walk into the game already set up - a suprise activation could be good fun in such a game!
EDIT - I did not really get the effect that I wanted. I had envisaged something that looked like the clothing that the Sea Devils from the old Dr. Who episodes wore some thirty odd years ago, where the reptile like creatures had a sort of sack-cloth type clothing. Anyway, some ladies fishnet stockings gave me the sort of material that I wanted, I might look out for some modellers leaves just to add a bit more dressing or some sort of tassle.
 |
| Edit - updated Seeder model, see above |
The Aliens are particularly easy to paint. Primed black and then brushed white (a white primer would probably be better than this two tier process). Royal Purple (Vallejo) then covered the miniatures and is also pushed into the joint crevaces and ribs etc.
 |
| The Alien menace |
The whole figure is then dry brushed with a bone or ivory colour, followed by heavy inking when dry. This is a surprisingly fast way to get 30 chunky figures table ready. The purple mostly disappears, so you might want to junk that process or at least limit it to more significant areas.
The flamers on each marine squad base have a bit of clump foliage anchored to both the base and the front of the flamer weapon. This was soaked with a PVA glue mix to 'fix' it and then under-coated with black primer and then built back up to look like a bellow of flame.
 |
| Squad with flamer and a heavy support weapon base |
A variety of base sizes in both circular and rectangle shapes have been used, in an effort to minimise the footprint when possible, without reducing the visual effect. The Marine support weapons fit snuggly onto 25mm discs. I am working on some rules that will allow a side to have three bases in a hex at any one time.
 |
| The Dreadnought crosses rubbled ground |
The bases avoided too much greenery, instead a more arid, 'desert like' look was sought, so that the armies could be used in a variety of settings without looking too much out of place. A basing paste with brown paint added went down first and was then scrubbed with Games Workshop Zamesi Desert. Stones and small areas of flock were then sparingly applied.
My hexed city boards are just 8 hexes wide by 6 hexes deep over a 2' x 3' playing space. The army packs as supplied are more than adequate for getting interesting games into that space.
 |
| The Queen with her brood |
Overall I am really pleased with the way that the two armies finally look, especially considering the relatively low investment in time and money. I am now writing (2 page) rules and scenarios for battles fought over my hexed city scape terrain.
The first play tests are going well using my city scape terrain.
 |
| Marines enter the city, not sure what awaits |
There are enough unit types to give individual traits that help bring some character into the game, while still keeping the rules overhead low.
 |
| 2 Alien bases (1 with a hit marker) protect the nest |
The rules have some similarities to my Tigers at Minsk system, so bases will acrue markers, but here they are hits rather than pins. The marines do get a sense of pending doom as the Aliens approach. Ranged fire can break up attacks, but they will often get through (see below) and fighting gets down to close combat.
 |
| Aliens launch an assault against Marines caught in the open |
RESOURCES
Building a city scape
Pendrakens 10mm range
Miniature Wargames magazine
My sister website COMMANDERS
Really nice modeling work, Norm. Your post makes my creative juices start to warm up.
ReplyDeleteReally nice work there, sir. the pendraken stuff is excellent I painted up the same marine force a while back....
ReplyDeletehttps://rantingsfromunderthewargamestable.wordpress.com/2014/05/24/10mm-sci-fi-this-time-its-war/
Though I personally didn't like the walkers (I still haven't painted mine), haven't played a game yet as my opponent (my eldest son) still hasn't painted up his Aliens.
Cheers Roger.
Jay, I think you would enjoy the freedom of tinkering with a sci-fi system, while having the sort of game space (8 x 6 grid) that we both appreciate.
ReplyDeleteRoger, I agree, the walkers could be better and are slightly awkward to assemble because the top half is slightly off balance from the legs, you need a fairly fast drying glue, once the two pieces are locked together they are fine.
I had recently bought some Games Workshop Cadians to experiment with doing a similar project in 28mm, but I think the small scale works better for me and it pushes the game up one level from strictly skirmish, while keeping the table small.
I enjoyed your blog - and think you may end up painting your son's Aliens..... sounds like he is a good strategist :-)
In the time you have acquired the figures and painted them i have....done nothing (gaming wise at least). Very jealous. They have come up really well. The whole way through I was thinking what rules were you going to use. I should have known - your own :-) Duh!
ReplyDeleteHi Shaun, I am quite pleased with how the rules are working out, a lot of little nuances cropping up on the battlefield - though the 'busy' nature of city terrain helps that.
ReplyDeleteThis must be the fasted project that I have done from purchase to play, which is good for keeping the motivation going.
Very nice work. I've never seen Pendraken 10mm figures up close, but I may have to now that I've seen what you have accomplished. Damn--I've got to quit reading blogs like yours--too inspirational. (Like I need another project!)
ReplyDeleteBest regards,
Chris Johnson
Hi Chris, thanks for commenting.The good thing about this particular project was that for a new 'thing' it was relatively cheap and fast to put together. Due to the vehicles and 'large' aliens - this looks less like a 10mm game than some other periods would look. Good to get a lot of game into such a compact area though.
ReplyDelete