
Having got my 1809 project to a point where a six unit French force and a four unit Austrian force now sit fully painted in their respective barracks, I have been enjoying pushing them around the table to the beat of some Neil Thomas scenarios.
His One Hour Wargames book has 30 generic scenarios and a variety of 2-3 page rule sets covering various major periods. Taken together, it ensures that whatever your interest, you only need small forces and a 3x3 space to get a game going.
With the units I have to date, I can do 10 of the 30 scenarios and due to their generic nature, I can treat all of them all as 1809 Danube actions.
For a table, I am using a 4x4 space rather than 3x3, simply because I prefer to avoid the visual distraction of marking the three foot boundaries off.
For rules, I shall use my own home brew set, as I continue to develop them through repeat play. By chance, my rules allow infantry in line to move 8”, while OHW have a movement rate of 6” so that pretty much softens the table growing from a 3x3 to a 4x4.
Anyway here are a few shots from some of the gaming situations falling from Danube fighting that I have enjoyed over recent days.
Scenario 30 - Last Stand.
A veteran and hardened formation from Red Army (Austrians) is acting as rearguard to their routing army. They have established themselves on the far side of a river with two crossing points. Can they make a respectable Last Stand against the attentions of Blue Army (French)?
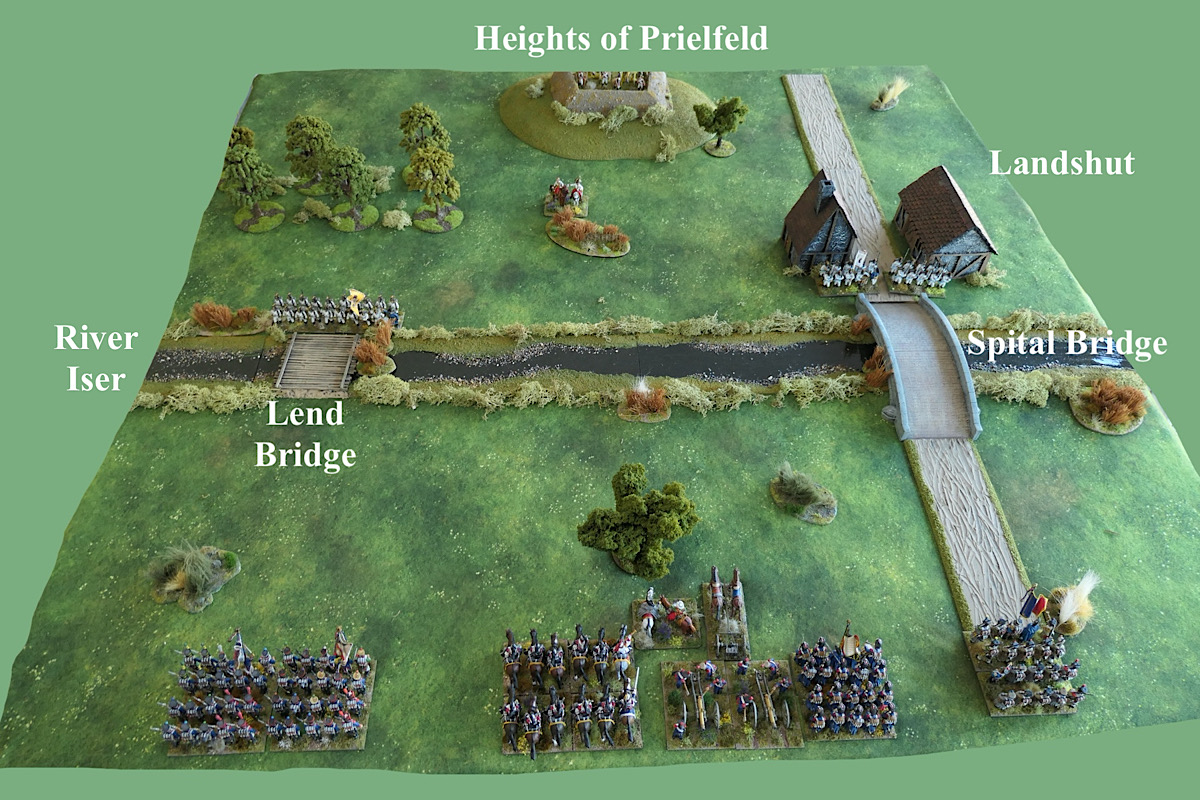
There is an interesting action described in Osprey’s Eggmühl 1809 (storm over Barvaria) book on pages 47 - 50, which coincides very closely with our Last Stand scenario and terrain set-up, even with artillery batteries up on the heights and two bridges and a town, so I took the liberty of transposing those place names and unit designations onto this table, it just added a bit of extra character to what was a generic scenario.

I rather liked the back and forth at the village as it passed hands several times. You often read about this sort of thing in accounts, but it is generally harder to do in war-games as time scales and units burning out often only allow an attack and perhaps one counter-attack, not much more.

In the end, the French took the village from the exhausted Austrians. At the same time, at the Lend Bridge, the French, after high losses took the bridge and cleared the way ahead. French heavy cavalry then poured over the bridge, moving across to the village, to chase the remnants of Austrian infantry from the field.
In the last moments of battle, French infantry in columns, assaulted the redoubt on the hill twice and twice their assault withered in the face of canister fire from the Austrian guns. The Austrian Last Stand had held on ….. just, literally on the last die roll!
Scenario 27 - Disordered Defence.
Red Army (French) have three units guarding a crossroads. A further three units are due to arrive for support, but not until turn 8. In the meantime, Blue Army (Austrian) with just 4 units are trying to take the cross roads before enemy reinforcements arrive.
The essence of this scenario appears to be that the attackers have a small window to concentrate against a slightly smaller force, but even 'if' they defeat this force they can still expect to be roughly handled by them - the question then becomes will those tired attackers be able to withstand the onslaught of the fresh turn eight French reinforcements?

This series of Neil Thomas scenarios in this book result in quite bare tables for the most part when it comes to terrain. Only the essentials are provided, no doubt to focus attention on what matters …. However, it is nice to have a bit of ‘pretty’ on the table and this particular scenario is very barren, with just two roads there to give us the important crossroads, so we can indulged in a bit of window dressing, but none of the added features will impact the game in any way, everything is treated as open.

In the first stages of this game, the Austrians did manage to maintain their momentum, but at some cost to themselves.
They broke the French flanks and went on to push the French centre back off the crossroads, just as the French reinforcement was arriving ... that was close!

Tired and half spent, they managed to cover the lateral road, but you can see that the Austrian infantry unit lagging at the bottom of the screen has already taken 6 Heavy Casualty points .... and is not going to last long.

The Austrians did try to take the initiative, their dragoons charging the cuirassiers, but the fresh French horse had no trouble counter charging and the dragoons fell back ... significantly mauled (don't forget, the field isn't really there!).
The French guns at close quarter with their canister did much of the work, clearing the crossroads and the Austrians were too exhausted to do anything other than fall back. The French reclaimed the objective.
Over the full course of play, it has been the Austrians who have taken the greater number of losses.

Between these two very playable games and the pleasure of getting the painted forces to the table, I had a thoroughly enjoyable bit of gaming, which underlines the accessibility of the Neil Thomas approach for small collections and gaming spaces. They were both quite tight games.
I have a renewed respect for the OHW book, I just wish the author would put pen to paper again …. it has been too long.
Importantly, after a couple of afternoons of gaming, I remain enthused to get more units painted to allow for the Battle of Auberge with its eight units per side, but first the Austrian Grenadiers need more work to clear the painting sticks if they are to make way for the hussars!
Resource Section.
A previous post discussing the 1809 Project. LINK
https://battlefieldswarriors.blogspot.com/2023/12/kicking-off-1809-project.html
My sister webspace ‘COMMANDERS’ showcases the various figure and boardgame systems that I am enjoying and gives a flavour of where current projects are up to. Link.


